Troubleshooting Manual
Just like any other piece of outdoor power equipment, lawn mowers are often subjected to harsh environmental conditions such as dust and heat, making it likely that you’ll face small issues every now and again. However, most of these are simple fixes that can be carried out at home without the need of having an authorized technician.
Despite this, if you have no prior experience working on power tools, it’s highly recommended that you avoid attempting any major service on your machine. Always remember to exercise caution when working on the machine.
Always prioritize the safety of yourself and those around you
Ensure that you thoroughly acquaint yourself with some basic guidelines before you attempt to carry out any service on your lawn mower:
- Ensure that you’ve read the complete owner’s manual and gone through all the operational instructions before using the mower
- Do not allow anyone unfamiliar with your mower’s intricacies to operate the machine
- The rear-shield located at the back of the mower has been installed for your personal safety and must never be removed
- Never put your hands or feet underneath the mower or tilt the machine when the engine is running. The blades are extremely dangerous and must only be serviced when the machine is off. Always give a few moments for the blades to stop rotating after turning off the engine.
- Never stand in front of a self-propelled mower with the engine running
- Ensure that you clear regularly inspect the mowing area and clear it of any stones, toys and other similar foreign objects
- Keep children and pets away when the mower is being operated – never allow the mower to be operated by a child
- Never wear loose fitting clothing when operating your mower
- If the mower hits an object while mowing, turn off the machine and ensure that the blade is not bent before continuing to mow
- Replace any damaged parts on the mower as soon as possible
- Mow only when there is adequate lighting – avoid mowing at night unless there’s ample artificial lighting
- Exercise extreme caution when mowing over inclined surfaces
- Avoid mowing over wet grass – give the lawn enough time to dry out if it has been watered recently
- Do not allow the mower to move too fast when mowing downhill
- Operating the mower wearing slippers or flip-flops is not recommended
- Ensure that you only replace the mower’s parts with genuine replacements purchased from an authorized store
- If you’re unable to determine the cause for a particular fault, do not attempt to fix it and take the unit to your service station
- Ensure that the mower is stored in a well-ventilated place when putting away after use
- If operating the mower after a long interval, ensure that you replace the fuel with fresh gasoline
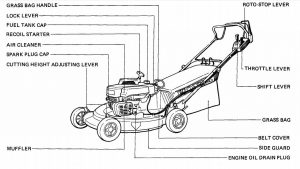
Locating the main operational controls
Before you attempt to operate the mower for the first time, it’s essential that you’re familiar with all the main controls
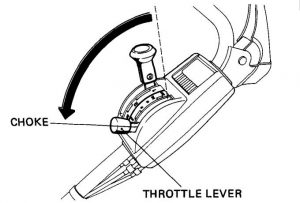
1.Throttle lever:
The throttle lever is used to control the engine’s throttle response and ca be set to three positions – START, HI or LO.
2. Flywheel brake lever:
The flywheel brake lever is used to stop the engine or allow it to run when released. The lever is held against the handlebar to allow the engine to run.
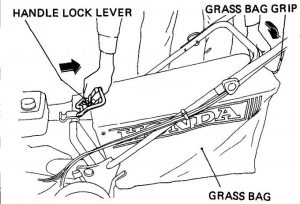
3. Grass bag handle:
The mower’s bag can be equipped and uninstalled with the grass bag handle.
4. Height adjustment levers:
The mower’ height can be increased or decreased with the wheel’s independent height adjustment levers.
5. Recoil starter grip:
Pulling the recoil starter is the first step to cranking the engine
Checklist before starting the mower
1.Check the engine oil level
The engine’s oil is a critical factor to your engine’s wear and tear and can influence its long term life. Do not use 2-stroke engine oils or non-detergent oils.
Use only Honda 4-stroke oil or an equivalent quality of lubricant with the recommended density and viscosity. Do not overfill beyond the oil level.
2. Check the fuel level
Honda recommends using unleaded fuel as it leaves a lower amount of deposits on the engine and spark plug. Ensure that fuel has been replaced if starting after a long time.
Refuel only in a well ventilated area and when the engine is cold. Ensure that the area is dry before starting the engine as split fuel may ignite or begin to smoke.
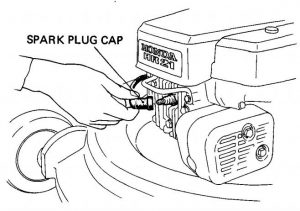
3. Spark plug gap
Inspect the spark plug assembly and ensure that the wiring has been connected. Check that the gap is at the recommended level.
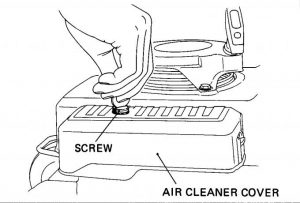
4. Inspect air cleaner:
Ensure that the air filter’s element is clean and has been replaced if necessary. Ensure all the fastening bolts are also securely tightened.
Honda Mower’s troubleshooting tables
We recommend to troubleshoot your mower at a licensed service station, there is a number of troubleshooting that however can be done alone. It is up to you to decide if you have enough technical experience to troubleshoot your machine alone. .
Table no 1. General troubleshooting table applicable for all Honda Mower models
| Problem | Solution |
| Engine has flooded | Turn the fuel valve off before switching off the engine. Take out the spark plug to dry it out. After drying, re-install and thread it until it seats with the washer compressed. |
|
Engine will not start
|
Check the fuel level to ensure there is adequate gasoline |
| Ensure that the spark plug is not loose or has not been disconnected | |
| Inspect the air filter and check for dirt or debris – replace with a new one if necessary | |
|
Engine starting hard and losing power
|
Inspect the gas tank for dust and debris – clear out the tank if dirty |
| Inspect the air filter element and replace if damaged | |
| Check for the presence of water in the gas tank | |
| Inspect the gas cap to ensure that the air vent has not been clogged | |
|
Mower operates erratically
|
The spark plug could be faulty or the gap might need to be reset |
| The air cleaner element may need to be replaced | |
|
Engine tends to overheat
|
The spark plug gap might need to be reset or the assembly may need replacement |
| The air filter element may be dirty and need to be replaced | |
| Cooling fins located outside the engine may be clogged and require cleaning | |
| Inspect the engine’s oil tank to check if the oil level is low | |
| Check whether the starter pulley assembly has been clogged by grass clippings | |
|
High amount of engine vibration
|
The blades may need to be balanced or loose |
| Inspect the engine mounting hardware for secure fastening to the unit | |
|
Mower cuts unevenly
|
Ensure that the cutting height adjustment is the same for each of the four wheels |
| Inspect the blade for sharpness and balance – replace with a new one if necessary |
Honda Mower’s maintenance and service
Your Honda Mower will maintain its normal operation and fuel usage if you will perform regular maintenance and service. We’ve put together a list of service tips that you can follow at certain time intervals
Table no 2. General service and maintenance work to be performed on Honda mowers
| Maintenance Schedule | Task |
| Each Use | Check engine oil level |
| First Month | Change the engine oil |
| Each Use | Inspect the air cleaner element |
| Every Month | Clean the air cleaner element |
| Each Use | Inspect the tightness of the blade nuts |
| Each Use | Inspect the grass bag for tearing |
| After 6 Months | Replace the fuel filter |
| After 6 Months | Clean the spark plug and adjust if required |
| After 6 Months | Clean the spark arrestor |
| After 6 Months | Adjust the roto-stop cable |
| After 6 Months | Inspect the roto-stop system |
| Every Year | Adjust the ignition timing |
| Every Year | Check the valve clearance |
| Every Year | Clean out the combustion chamber |
| Every Year | Clean the fuel tank |
| Every Year | Replace the fuel tube |
Adjusting the Roto-Stop Lever, drive clutch and shift control cable
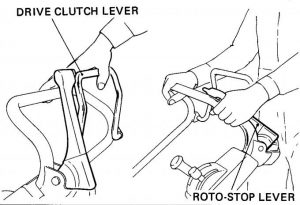
Roto-Stop Lever:
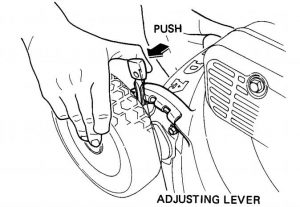
Measure the free play space at the tip of the lever and check that it is between 5 – 10 mm. If more adjustments are required, turn the adjusting bolt and increase or decrease the free play by adjusting the lock nut. Now proceed to tighten the lock nuts securely. Ensure that the rotary blade has been stopped when you release the Roto-Stop lever after making the adjustments.
Drive Clutch:
To adjust the drive clutch free play, first measure the length of free play at the very top of the lever as you did with the roto-stop lever. Ideally it should fall between 5 – 10 mm as well. If it’s necessary to make any adjustments, first loosen the clutch cable’s lock nut. After this, proceed to increase of decrease the length of free play by turning the adjustment bolt.
After making the necessary adjustments, turn and tighten the lock nuts to secure them in place. After this, ensure that the drive clutch can still operate well within its region by moving when being gripped and stopping when it is released.
It is advised that these adjustments are made by authorized Honda technicians unless you’re mechanically proficient and have the necessary tools. If so, move the throttle lever to the IDLE setting and start the engine. Now turn the throttle stop screw out or in as required, do this until the engine is running at about 1400 rpm
Shift Control Cable:
Before attempting to work on the belts, ensure that the mower’s engine has been tuned off and that the deck has been cleaned of any clippings and debris as they can enter the assembly and cause significant wear to the belts. Move the shift control lever to the position marked ‘3’ before removing the grass bag. Now proceed to loosen the three 6 mm bolts before taking out the bag’s opening panel. Now you can loosen the three more bolts and take out the belt cover.
Lift up the adjustable driving face up to move the drive belt towards the smallest section of the pulley’s assembly. Now you can loosen the cable’s lock nut and the continue turning the adjustment bolt so that any clearance between the contacting parts of the shift and tension arm have been eliminated.
After this has been completed, proceed to turn the adjustment bolt further by 3 – 5 turns in the counter clockwise direction. Now you can tighten the lock nuts securely.
Transporting and storing the mower
Transportation:
Turn the engine switch to the OFF position as well as the fuel valve before transporting the mower.
The handle can be folded and tucked out of the way for increased convenience. You can also uninstall the grass bag and remove it from the frame. Loosen the handle joint before pulling in the handle pipe towards the rear – then move the handle forwards until it comes to a stop. Collapse the handles by loosening the handle joints.
Ensure that you do not pinch or let any of the mower’s wiring get in the way while folding before transportation. If moving the mower of hard surfaces, set the cutting height to the maximum level.
![]()
Storage:
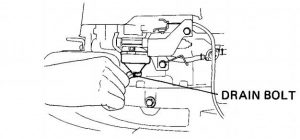
If the mower is going to be stored away for more than 30 days, it’s important that you carry out the necessary procedures in order to prevent corrosion or weathering. Firstly, drain out the fuel tank of all gasoline and also drain the carburetor – ensure that you only drain it into an approved gasoline container. Disconnect the fuel tube after this after turning the fuel valve to the ON position. Wait until the tank has been completely emptied.
After allowing ample time for all fuel to drain out, retighten each of the drain’s bolts before connecting the fuel tube. After this, turn the fuel valve to the OFF position.
Now yank out the starter rope until you feel a firm resistance – this indicates that the valves and the breaker points have been closed and are protected from dust and corrosion. Coat the exposed areas with a thin layer of lubricant.
if you intend on storing the mower away for more than a year, ensure that you’ve also removed the spark plug and filled the cylinder with approximately three table spoons of fresh motor oil. After this, pull the start rope gently a few times to help the oil distribute evenly.
Removing from storage:
Before attempting the start the mower after a month or longer in storage, take out the spark plug and inspect it thoroughly for any signs of damage. Clean or replace if necessary and check that the gap has been set at the appropriate level. After this, proceed to thread the spark plug by hand as far as possible before continuing to tighten it with the help of a wrench.
Check the engine’s fuel level as well as the oil level before starting the mower.